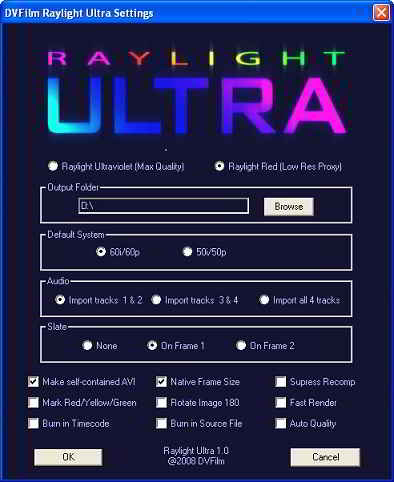
Raylight Ultra has been released by DVFilm as the successor to Raylight. DVFilm still supports Raylight, but development efforts in the future will be focused on Raylight Ultra. The core functionality of Raylight, and now Ultra, is coding and decoding MXF files. They do, however, both include the Raylight Plug-in for Sony Vegas: RayMaker, for converting MXF files to AVI, P2 Maker, for converting Raylight AVI to MXF, and also a control panel for working with the Raylight codec.

The best new feature in Raylight Ultra is a great improvement in performance. You should now be able to do real-time editing, with visual fidelity and smooth playback. Before Ultra, you would have to choose between either having smooth playback or full-resolution preview – to see proper full-res playback, the project would have to be rendered. The improved performance of Ultra allows you to preview on the timeline and have the best of both worlds.
This also means that there are now only two editing modes, instead of four. There is still a Raylight Red mode (Low Res Proxy) which allows real-time editing even on a project that’s very demanding or a machine that’s much slower – albeit with an image that significantly degraded.
The major difference between Ultra and the previous version is at the high end. Before, Raylight Blue, the best mode visually, wasn’t intended to preview the timeline in real time. Now, the Raylight Ultraviolet mode (max quality) is intended for real time as well as maximum quality. Of course, the complexity of your project, as well as the computer you’re using, will also have an effect on whether or not that’s actually possible.
In performance for previewing, the weakest factor will be the deciding one,so factors will decide the quality of the editing experience, not the efficiency of the codec. If Ultra isn’t delivering playback with smooth full-resolution, the problem probably lies somewhere else. It might help to use separate dedicated disks for video files, or to defrag your hard drive. There’s always the option of upgrading to a faster processor or hard disk.

On the configuration screen for Ultra, there’s a checkbox for ‘Mark Red/Yellow/Green’. This puts a colored border around lower-quality video, with the quality indicated by the border’s color. You might expect the checkbox to only offer the ‘Mark Red’ option, but the Yellow and Green modes are included for backward-compatibility.
Previewing in low-res (Red) is always less than ideal. To use it, it’s necessary to use DVFilm’s Raymaker to make low-res proxies. Depending on how many files you’re working with, this can take quite some time. The proxies also use up a lot of disk space. The AVI proxy can actually be dragged onto the timeline, and depending on Ultra’s configuration, it’ll display either the full-res clip or the actual proxy.
You can bypass compression and decompression when they aren’t necessary, by using Utra’s ‘suppress recompression’ feature. In order to use this, when setting up render in Vegas, you need to use the Raylight codec. Then, on the codec dropdown selection, click on ‘Configure’ and ensure that ‘Suppress Recompression’ is selected.
One feature of Ultra that could be very useful is metadata slating. This takes metadata from the P2 file, and inserts in the one of the first two frames of the clip on the timeline – Ultra’s default is to display the slate on the initial frame. It’s important to remember that slates render, so you’ll need to turn this feature off before final render. Also, the slate won’t appear on files that are part of a spanned clip.
Spanned clips are made when one clip has two be recorded in two separate physical files. this might happen because the file is more than 4.2 GB, and so can’t be handled by some P2 camcorders, or because a P2 card is full and there’s another available that has space on it.
Another metadata feature that’s quite interesting is the ability to map the P2 ‘UserClipName’ to ‘TapeName’ in Vegas’s Project Media window. When using the camera, the operator can use the P2 Viewer software or P2 CMS to name each clip. The P2 camera can also automatically increase the clip name’s last number incrementally. The clip name will show in Vegas in Project Media as the Tape Name (in detailed view). You can also drag the ‘Tape Name’ column to the left, possibly placing it alongside the name of the MXF file.
Overall, Raylight Ultra has great functionality, even though there are a few minor issues with some of the features.