Skype’s pretty much the default ‘name’ when it comes to VoIP (that’s Voice over IP, or layman’s terms, using your Internet connection as a virtual phone line) application. As such, rather like eBay or Google, it’s got a critical mass of users that makes it a very compelling proposition. Using Skype to call other Skype users is free (aside from any broadband connection you’re using, that is), and some of Skype’s plans are very competitive. I say some, because there’s a catch here.
The straight up fees for many Skype call to landlines are, in fact higher than many VoIP providers – companies like MyNetFone, Engin, Pennytel and GoTalk, for example – but if you take out a Skype subscription service (currently around $15 per month, but it fluctuates depending on currency conversion rates), Skype will let you make up to 10,000 minutes of calls a month to landlines across 36 countries. That’s only fractionally under a week’s continuous talking each month, which should be enough to satisfy even the hungriest phone junkie.
What You’ll Need To Use Skype
A PC – I’ve used the latest version of Skype, 4.0, which is currently available for Windows only at this stage, but Skype offers clients for Mac, Linux and a number of smart phones as well.
Broadband Connection – A minimum speed of 384Kbps is suggested by Skype if you want to make video calls, although slower connections should do well enough for basic voice calling, especially if you’re not using the broadband connection for anything else at the time.
Webcam – For video calling — You can always receive video calls if your caller has a camera, but two-way video conversation is much more appealing. Bear in mind that video calling is more data-intensive than just voice by a large margin, although Skype claims that the video format used in Skype 4.0 is more data-efficient than previous versions.
Headset Or Handset – The classic way to use Skype is with a PC microphone and headset plugged directly into the computer, but a number of manufacturers offer full Skype wireless handsets – not dissimilar to a cordless phone – that you can also use if you don’t want to be tethered to your PC.
Setting Up Skype
One of the nicest things about the Skype is that it’s easy to do and has lots of practical information within the setup routine to help you get the most out of your Skype account. Here’s a step-by-step guide to setting up Skype for voice and video calling.
Step 1 – Go to www.skype.com and download the Skype client.
Skype should detect your operating system and offer you a big friendly green ‘Download Skype’ button. The Windows 4.0 client weighs in at about 2.1M, so even on a slower connection; it shouldn’t take too long for you to download it.
Step 2 – Install the Skype client software.
Skype’s very simple to install – basically just a short wait while it copies files. While it does this, you may as well plug in your headphones and microphone, if you haven’t already. If you’ve bought a wireless handset, it should have its own setup instructions.
Step 3 – Create a new Skype account.

The Skype account creation process is likewise very simple you can do that from Skype client, no need to visit site or verify your email. Enter your chosen Skype name and a secure password (typically eight or more letters with a mix of lower and upper-case characters and at least one number), and click to agree to License Agreement. Skype will check if your username is already taken, and advise you accordingly. Skype insists on unique Skype usernames, but you can put your real name into the Name field without clashing. Bear in mind, if you decide to use your real name, it’ll be easier for your friends and family to search for you on Skype, but the downside is that you compromise your privacy.
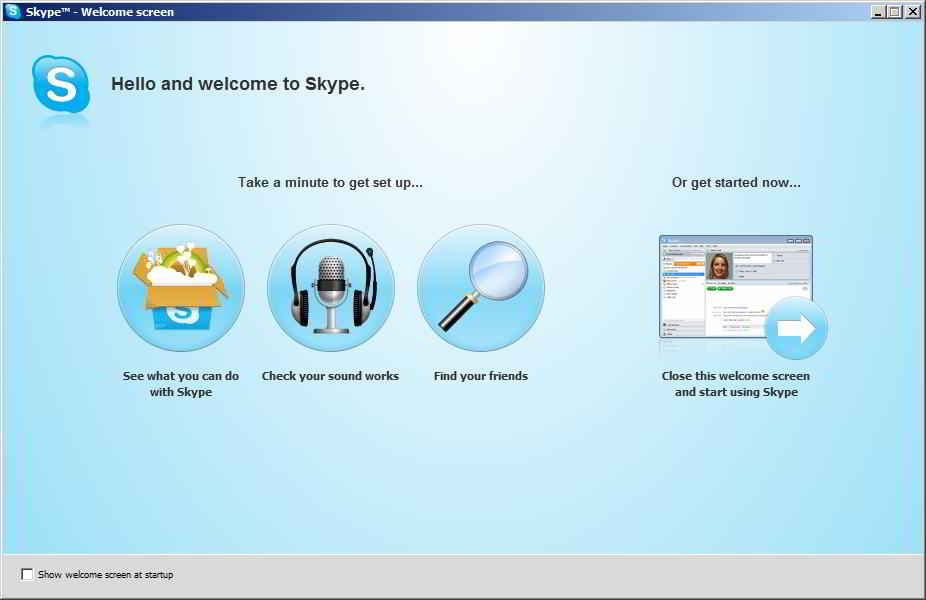
Step 4 – Run through the Skype welcome screen
Remember how I said that Skype did everything possible to make setting up Skype easy? Well, this screen is exactly what I meant. The welcome screen has four button choices: See What You Can Do With Skype, Check Your Sound Works, Find Your Friends, and Close Welcome Screen.
The first button runs you through the services Skype offers under both free and paid arrangements. It also has a quick guide to setting up Skype securely.

The second button allows you to test speakers, microphone and your Web camera (if you’ve got one) in a clear and logical manner. It’s just a matter of following the onscreen prompts and listening, talking and looking when prompted. Skype will tell you if it can’t find a relevant bit of hardware, or is having trouble hearing you speak as you go, so you can tweak settings as needed. The dialog also lets you make your ‘first’ Skype call, although it’s only to the call testing service, to make sure you can hear a Skype call, and then record a short snippet of your voice for playback.
The Find Your Friends button gives you two options for setting up Skype contacts. You can opt to give the application access to your Outlook, Outlook Express or Yahoo! Mail contacts list. Skype will then check those details against its own database and add users as it finds them. Obviously, you’ve got to once again weigh up privacy concerns against utility here. You can also just type a given name into the lower ‘Find a specific person’ box and see what Skype finds for you.
Making Call From Skype
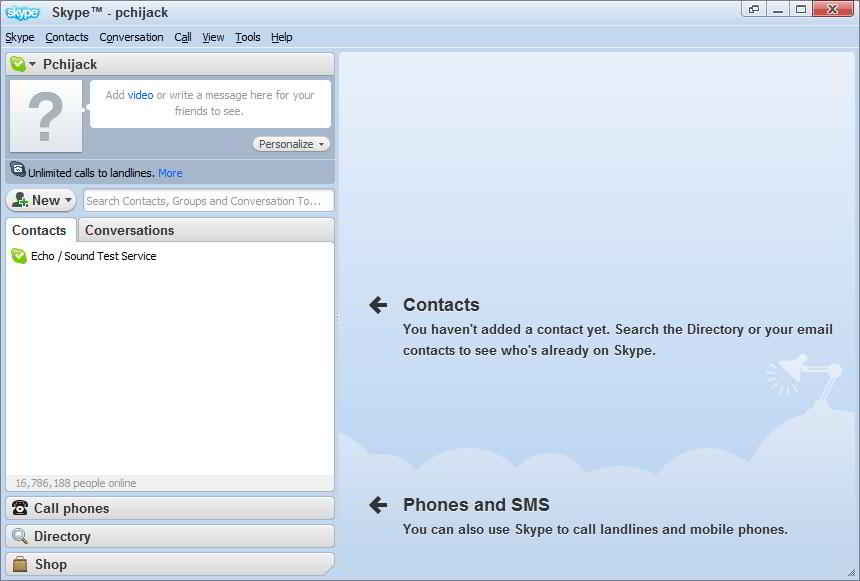
Once you’re done with the welcome screen, you can click on the final button to enter the Skype interface proper. By default, you’ll see the welcome screen each time you start up, but that can be disabled. One advantage to having the welcome screen pop up each time is that it allows you to calibrate your audio and make sure the correct devices are selected. There’s nothing worse than trying to make a call and being unable to be heard – or making a very private call that you think is going to your headphones, only to have it blare out of your PC speakers!

Skype’s made some changes to the 4.0 interface, mostly geared around collecting up the different things you can actually do with the platform. The contacts list is still at the heart of the Skype experience, but there’s also a Conversations tab that tracks your instant messaging-style conversations, outgoing contact requests and events as well.
While Skype’s best known for basic talk, the application itself offers three methods of conversation, and it’s simple enough to mix and match. Launching a spoken conversation is as simple as selecting a contact and choosing wither Call (for voice only) or Video Call (for video as well). Skype claims that 4.0 includes a more efficient video codec that allows for smoother video over slower connections, as well as the option for full-screen video, although you may have to tweak your settings to get the best possible results there.

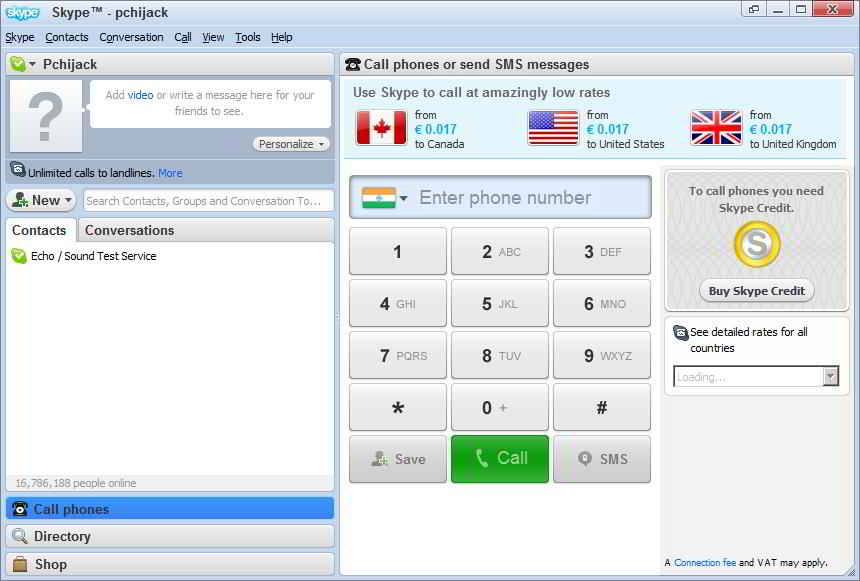
For calls to actual landlines or mobiles, you’ll need to click on the Call Phones option once you’ve either purchased Skype credit or a subscription this can also be done very easily by hitting Buy Skype credit button on right. Then select the country you want to call – this allows Skype to enter the correct international dialing code – and the number, and it should connect and start ringing just as if you were making a normal phone call.
Video Call won’t appear as an option if you haven’t set up a webcam, or if Skype can’t detect one on your system. The final part of Skype’s contact equation is a simple instant messaging client – similar to MSN, Yahoo! or Google Talk, that allows you to type conversations to online Skype users.